

Turn a Recruitment Tracker into a Process Map with Power Query
Turn application date columns into a list of steps, check the result, and use it in Threadseer. A simple Power Query walkthrough with a downloadable example.
Your recruitment spreadsheet has one row per application, with separate dates for Applied, Interviewed, Offered, and Started. A process map needs one row for each recorded step.
Power Query can make that change and remember it for next time. Here is a small example you can follow in Power BI Desktop.
| Application ID | Applied At | Interviewed At | Offered At | Started At |
|---|---|---|---|---|
| APP-003 | September 3 | September 6 | September 9 | September 24 |
Scroll across to see all four date columns →
Power QueryTurn date columns into rows
| Application ID | Activity | Timestamp |
|---|---|---|
| APP-003 | Applied | September 3 |
| APP-003 | Interviewed | September 6 |
| APP-003 | Offered | September 9 |
| APP-003 | Started | September 24 |
APP-003 stays on every row. Other columns and original times are kept; dates are shortened for display.
1. Open the example
In Power BI Desktop, choose Get data → Text/CSV and open the downloaded file. Set Data type detection to Do not detect data types, then choose Transform Data. This keeps the sample’s dates as written.
Name the query RecruitmentEvents. If the headings say Column1, Column2, and so on, choose Use First Row as Headers.
Each Application ID belongs to one application to one role. This example follows 12 completed hires, with all four dates recorded.
2. Turn the date columns into rows
This change is called unpivoting. You can do it through the menus:
- Select Applied At, Interviewed At, Offered At, and Started At. Hold Ctrl while selecting the four headings.
- Right-click a selected heading and choose Unpivot Only Selected Columns.
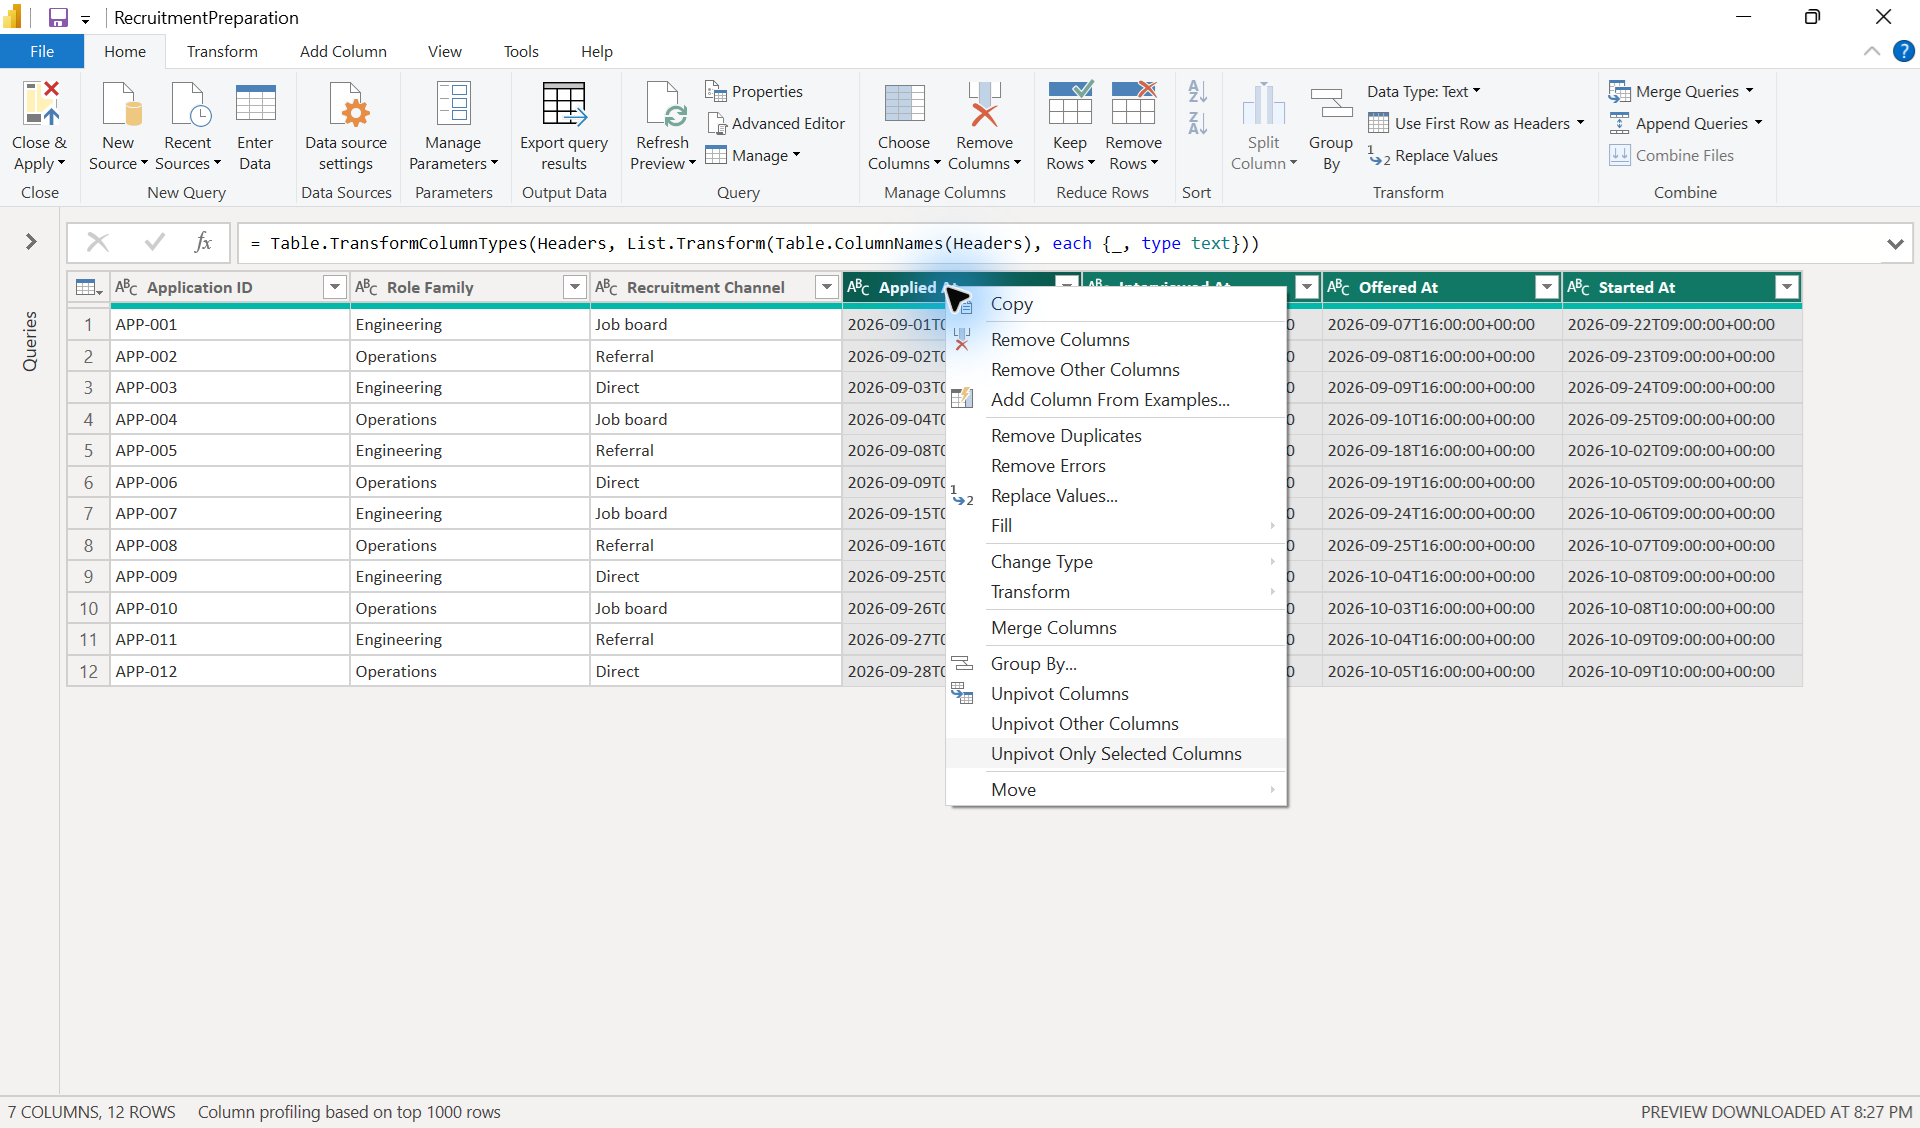
- Rename Attribute to Activity, and Value to Timestamp. Double-click a heading to rename it.
- Click the data type icon beside Timestamp and choose Text. The sample already includes the information Threadseer needs to read these times.
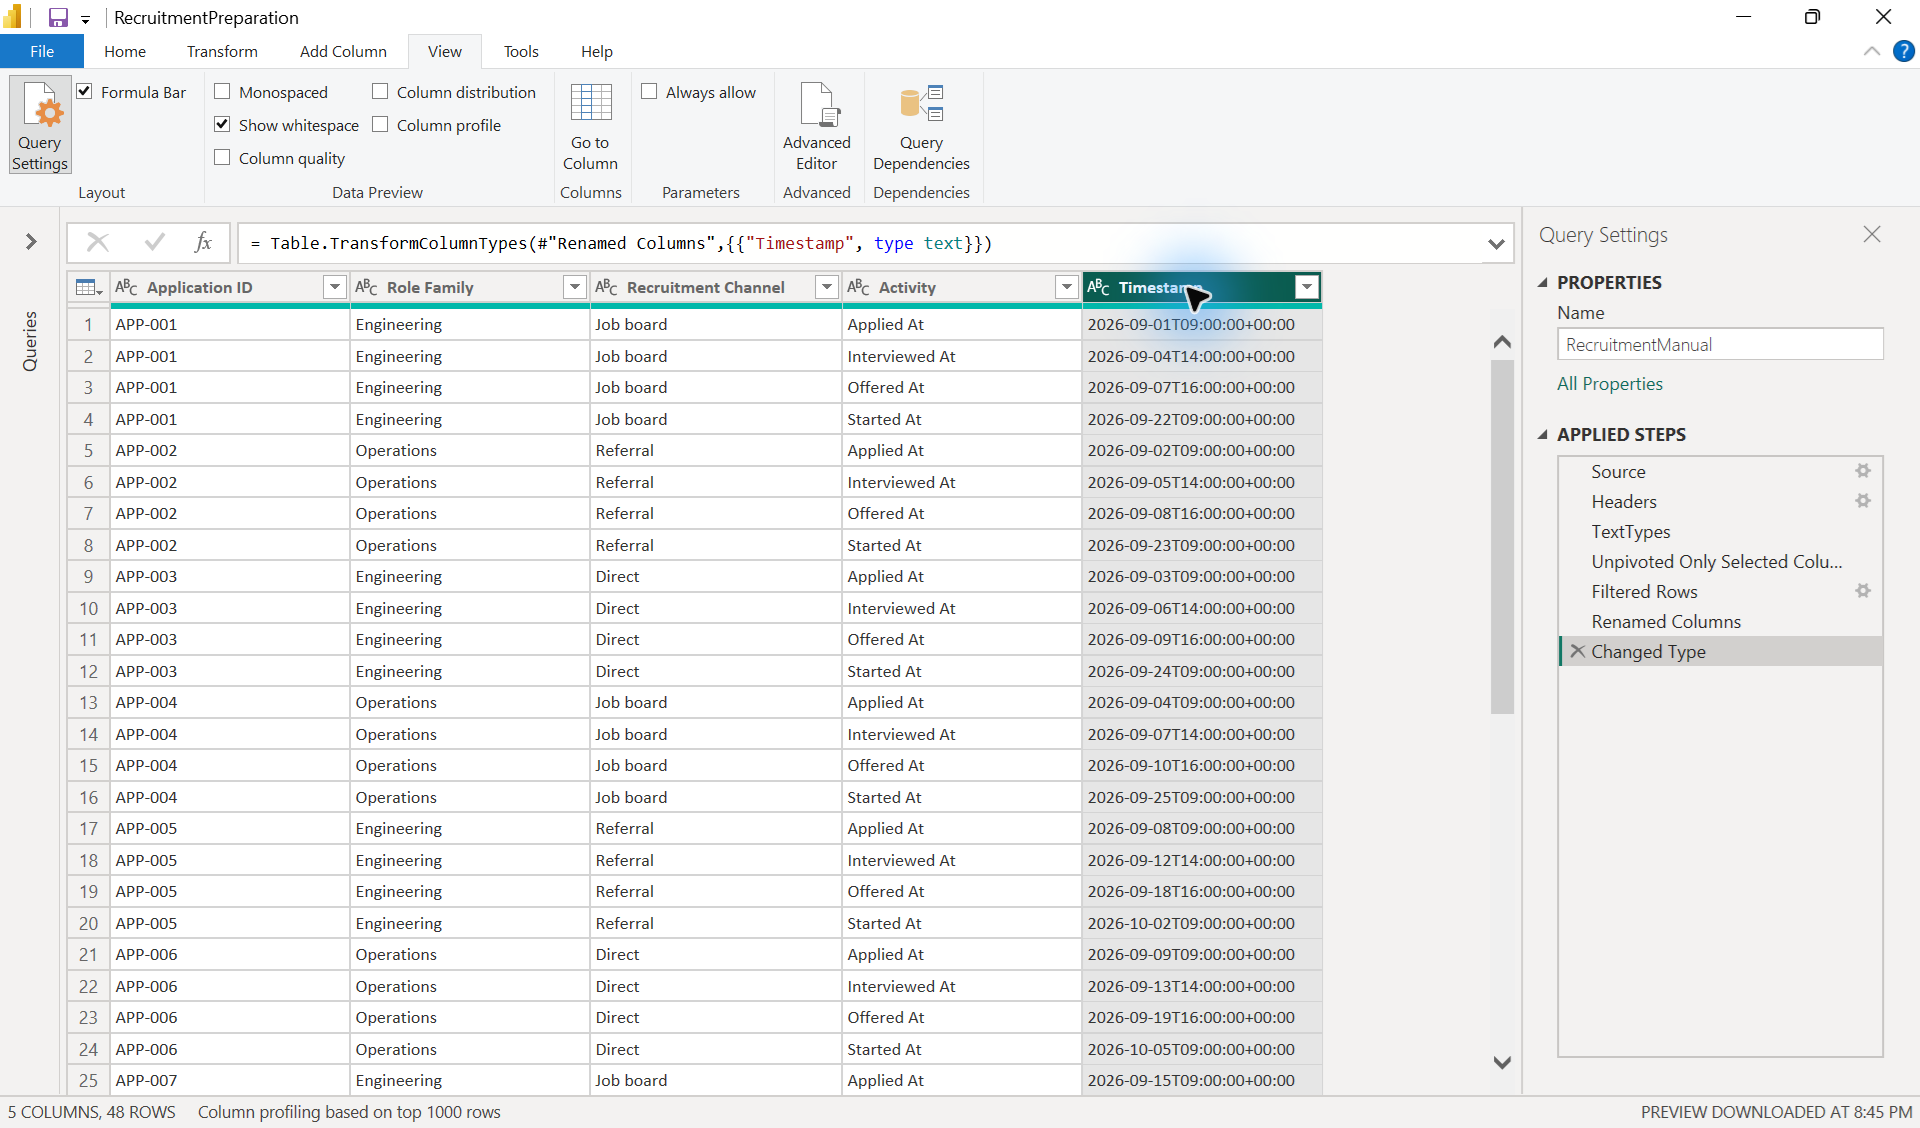
- Open the filter beside Timestamp and choose Remove Empty. The sample has no blank dates; this step removes missing dates when you use your own tracker.
- Right-click Activity and choose Replace Values. Find
At(including the space before At), and leave Replace with empty. The names become Applied, Interviewed, Offered, and Started.
Application ID, Role Family, and Recruitment Channel stay alongside each step. You do not need to write any code.
3. Check the result
You should now have 48 rows representing 12 applications. Each row has an application ID, an activity, and a timestamp, plus the role and recruitment channel.
- Applications
- 12The original application IDs.
- Recorded dates
- 48Four dates per application.
- Prepared rows
- 48One row for each recorded step.
Check APP-003: it should have Applied, Interviewed, Offered, and Started, matching the four dates above. Every sample application should have those four steps.
The prepared sample is available if you want to compare your result. When the counts match, choose Close & Apply.
4. Draw the map in Threadseer
Add Threadseer to your report. The first process-map walkthrough covers installation.
Select the visual and map these columns in its Build pane. Threadseer calls each application a case.
- Application ID
- Case ID
- Activity
- Activity
- Timestamp
- Timestamp
- Role Family
Recruitment Channel - Additional DimensionsOptional
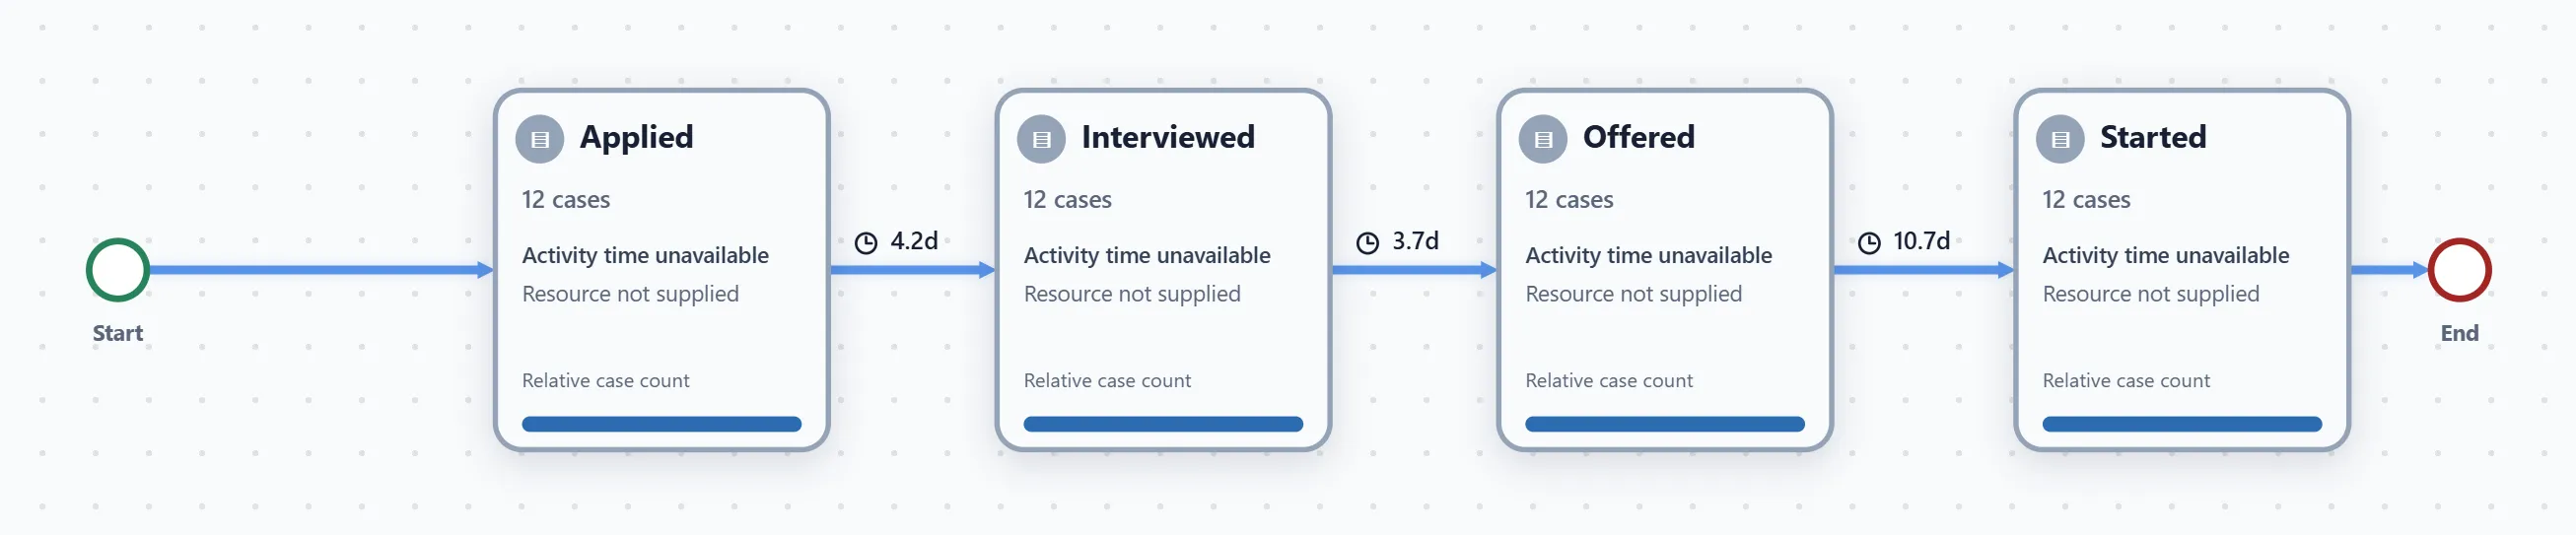
Choose Analyze this selection, check Data Quality, then open Process Map. To include all applications, set Path scope to Case coverage, Top case coverage to 100%, and Minimum cases to 1.
Scroll across to follow the steps →
12 applications · 48 recorded steps. All follow Applied → Interviewed → Offered → Started, then End. Clock labels show the average time between recorded steps. Open full-size map →
This example focuses on completed hires. Your own tracker may include other routes or applications still in progress.
Next time, refresh
Power Query remembers these steps. When you replace the tracker at the same file location, choose Home → Refresh in Power BI, then Analyze new selection in Threadseer to update the map.
For your own tracker, use a separate ID for each application and confirm what the date columns mean. If interviews can happen more than once, use a history export that records each occurrence; a single Interviewed At column cannot show repeated interviews.
Want more help? The optional sample guide includes a refresh exercise, troubleshooting, and instructions for using the ready-made Power Query recipe.